
Chroma Key Guide (Green/Blue Screen)
FMX includes built-in chroma key processing that removes a solid-colored backdrop (green or blue) and replaces it with a transparent or custom background. This guide covers how to enable chroma key, configure the adjustment sliders, and troubleshoot common issues.
Before you start: For new events, we recommend AI Background Removal over a physical green screen -- cleaner cutouts, faster setup, no backdrop required. See Green Screen vs AI Background Removal for the full comparison. The rest of this guide applies if you are running an existing green screen setup.
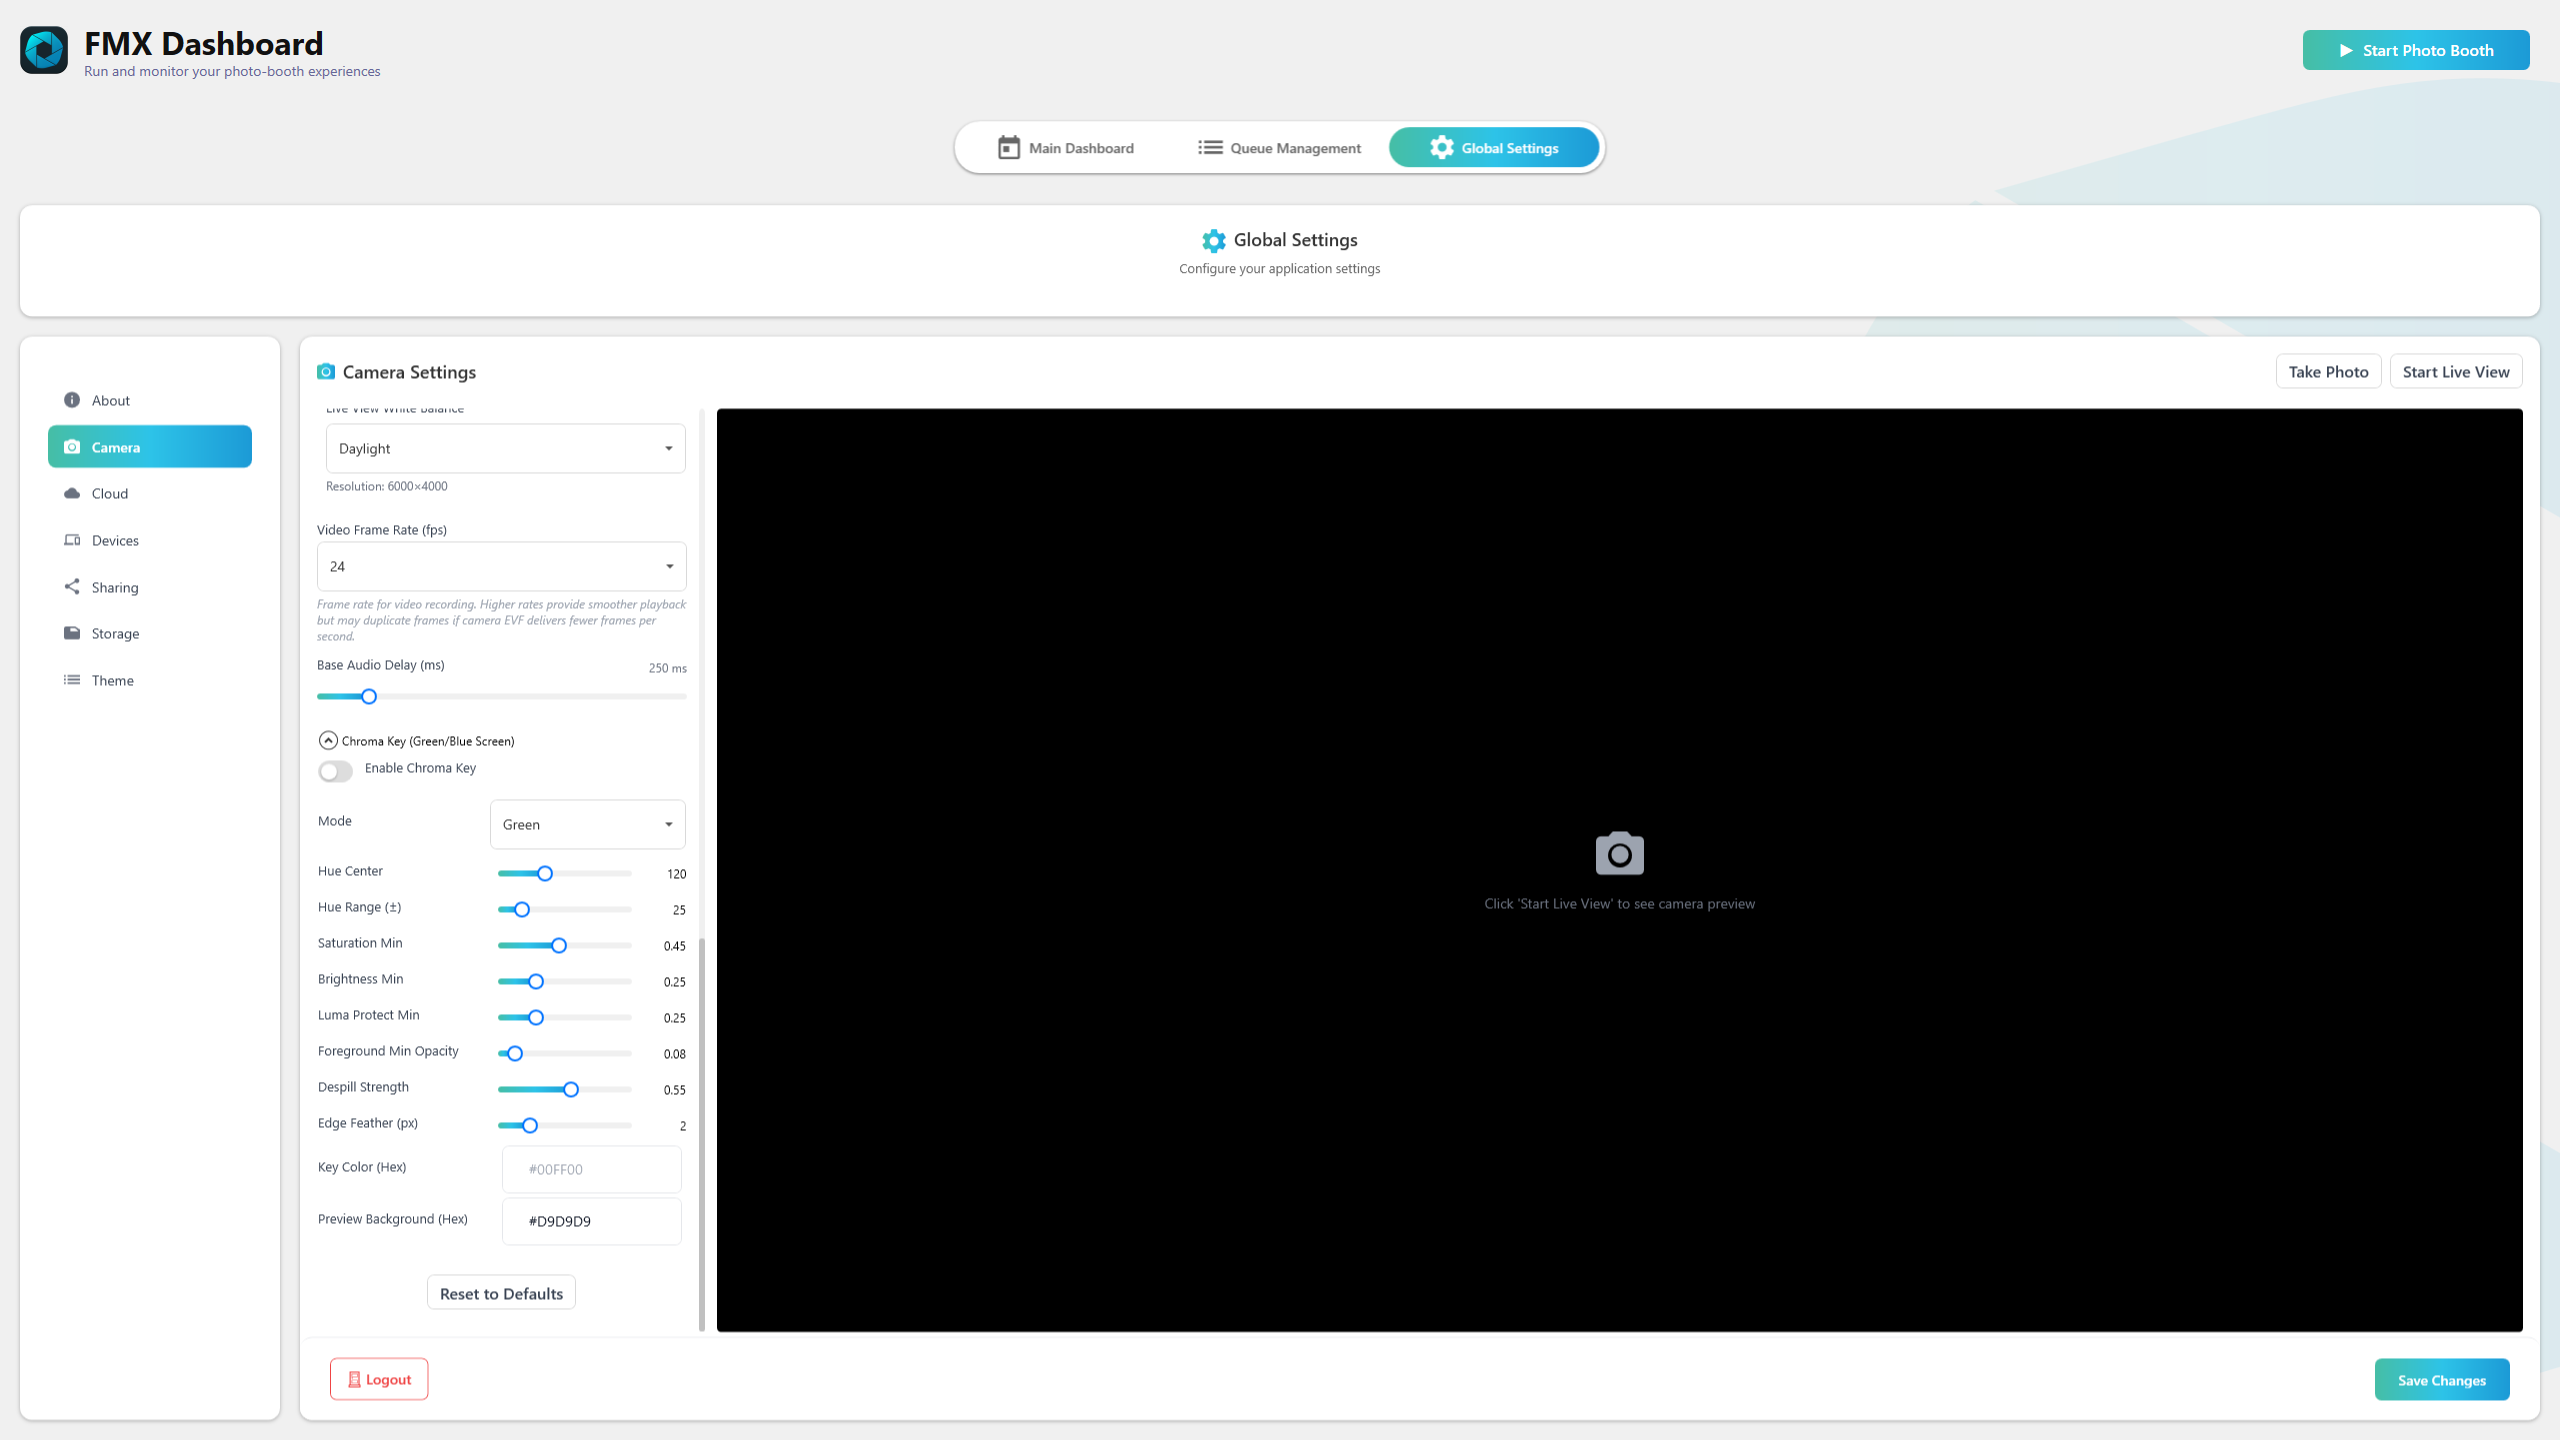
Enabling Chroma Key
Chroma key can be enabled from two locations in FMX:
- Workflow settings -- Add or configure a Live View step with Background Mode set to Green Screen or Blue Screen.
- Global Settings > Camera tab -- Set the Live View Background Mode to Green Screen or Blue Screen.
When enabled, FMX processes each frame to detect and remove the specified backdrop color, applying the result to both the live preview and the final captured image.
Backdrop Color Mode
Select the backdrop color that matches your physical screen:
- Green -- Standard green screen (chroma green). The most common choice for photo booths.
- Blue -- Blue screen (chroma blue). Useful when subjects are wearing green clothing or accessories.
- Custom -- Specify a custom hue value to key out a non-standard backdrop color.
Tip: Green screens are preferred in most photo booth setups because green is the least common color in human skin tones and clothing, resulting in cleaner key results with less spill.
Adjustment Sliders
FMX provides fine-grained control over the chroma key process through the following sliders:
Hue Center
The target hue value to remove, specified in degrees on the color wheel (0-360):
- 120 for green screen
- 225 for blue screen
- Adjust if your backdrop is a non-standard shade of green or blue.
Hue Range
How wide the color match extends from the Hue Center value. A range of 25 means the keyer removes colors from Hue Center minus 25 to Hue Center plus 25:
- A typical starting value is +/- 25.
- Increase the range if patches of backdrop are still visible.
- Decrease the range if the keyer is removing parts of the subject.
Saturation Min
The minimum color saturation a pixel must have to be considered part of the backdrop:
- A typical value for green screen is 0.45.
- Lower values key out less saturated pixels (useful for shadows on the backdrop).
- Higher values are more conservative, only removing strongly colored pixels.
Brightness Min
The minimum brightness a pixel must have to be considered part of the backdrop:
- A typical value for green screen is 0.25.
- Lower values include darker areas of the backdrop.
- Higher values exclude dark pixels from being keyed, which can help preserve dark-haired subjects.
Luma Protect Min
Protects bright white pixels from being keyed out, even if they fall within the hue range:
- Useful for preserving bright highlights on the subject (white clothing, reflections, teeth).
- Increase this value if bright areas on the subject are becoming transparent.
Foreground Min Opacity
Controls the minimum opacity applied to edge pixels, affecting how transparent the transition zone between subject and backdrop appears:
- Typical range: 0.08 to 0.12 for clean edges.
- Lower values produce harder, more defined edges.
- Higher values retain more semi-transparent fringing.
Despill Strength
Removes green or blue color spill that reflects onto the edges of the subject:
- Increase this value if you see a green or blue tint along the subject's hair, shoulders, or clothing edges.
- Higher values apply more aggressive color correction to edge pixels.
Edge Feather
Softens the boundary between the subject and the removed backdrop:
- Typical range: 1 to 3.
- Higher values produce a softer, more gradual transition.
- Lower values produce a sharper cutout.
Recommended Starting Values
Green Screen
| Slider | Value |
|---|---|
| Hue Center | 120 |
| Hue Range | 25 |
| Saturation Min | 0.45 |
| Brightness Min | 0.25 |
Blue Screen
| Slider | Value |
|---|---|
| Hue Center | 225 |
For the blue screen, start with Hue Center at 225 and adjust the remaining sliders using the same general approach as the green screen, tuning to match your specific backdrop and lighting conditions.
Tip: Start with the recommended values and make small adjustments one slider at a time. Preview the result in FMX live view to see changes in real time before capturing.
Troubleshooting
Subject appears transparent
Parts of the subject are being incorrectly keyed out:
- Lower the Saturation Min value to be more selective about which colors are removed.
- Narrow the Hue Range to restrict the keyer to a tighter color band.
- Increase Luma Protect Min if bright areas on the subject are affected.
Green or blue edge halos
A visible green or blue fringe remains around the subject's edges:
- Increase Despill Strength to remove more color spill from edge pixels.
- Increase Edge Feather to soften the transition and blend the boundary.
- Slightly increase the Hue Range if the fringe color falls outside the current match window.
Backdrop patches are still visible
Sections of the green or blue backdrop remain in the output:
- Increase Hue Range to capture a wider band of backdrop colors.
- Adjust Brightness Min downward to include darker patches of the backdrop.
- Lower Saturation Min to include less saturated areas (often seen in backdrop wrinkles and shadows).
Tips for Best Results
- Even lighting -- Light the backdrop as evenly as possible to minimize shadows and hot spots that create inconsistent hue and saturation across the surface.
- Avoid matching colors -- Ensure subjects are not wearing clothing or accessories in the same color as the backdrop, or those areas will be keyed out.
- Wrinkle-free backdrop -- Use a taut, wrinkle-free backdrop. Wrinkles create shadows and folds that shift the perceived hue and saturation, making it harder to get a clean key.
- Consistent lighting -- Maintain the same lighting intensity and color temperature across the entire backdrop. Mixed lighting (e.g., daylight from a window plus studio lights) can cause part of the backdrop to shift hue.
- Distance from backdrop -- Position subjects at least 3-4 feet from the backdrop to reduce color spill and ensure the backdrop is outside the depth of field when using shallow apertures.
Tip: Always test your chroma key setup with a live subject before the event begins. Hair, jewelry, and translucent fabrics (veils, scarves) are the most challenging elements -- verify they look correct before guests arrive.
Was this helpful?
Related articles
FMX for Windows: Customizing Your Experience
Everything at a photo booth event — the overlays, the countdown, the on-screen text, the email guests receive, the gallery they get a link to — is something you control. This guide
FMX for Windows: System Requirements
Before installing FMX on your Windows computer, make sure your system meets the requirements below. Meeting the recommended specifications will ensure smooth performance during eve
Installing FMX on Windows
When to Use First-time installation of FMX on a Windows PC Reinstalling FMX on the same machine Upgrading FMX to a newer version using the latest installer Requirements Windows 10
Building a FMX Preset From Scratch: Video Tutorial
This video covers the basics of building a workflow and layout in FMX — a good starting point before exploring the individual workflow step articles.
FMX For Windows: Full Software Video Tutorial
This video is a complete walkthrough of FMX for Windows — covering the dashboard, session lifecycle, Select/Sync/Play, camera and printer setup, workflow configuration, and Cloud s