
Image\Print Quality Troubleshooting Guide
This guide covers common image and print quality issues — stretched, dark, bright, blurry, or wrong-colored photos — and how to resolve them.
My Photos Are Stretched
If your photo prints appear stretched, even though the printing orientation seems right for the canvas orientation you're using, try changing it. If it's portrait, set it to landscape, and vice versa.
Change the printing orientation in the Workflow tab, under the Print Copies feature state.
My Photos Are Dark
- Make sure nothing is blocking your lens. Also, make sure to remove the cap from your flash:
- Make sure your flash is connected and fires when taking a photo. See the strobe flash troubleshooting guide.
- Check your camera settings (see the recommended camera settings guides for Mirror Booths and Retro Photo Booth).
- Press your camera's Menu button → Clear settings → Clear all camera settings → change your camera settings according to step 3.
My Photos Are Too Bright
- Check your camera settings (see the recommended camera settings guides).
- Try to decrease your flash intensity.
- Press your camera's Menu button → Clear settings → Clear all camera settings → change your camera settings according to step 1.
- Decrease the camera's ISO.
My Photos Are Blurry
- Focus your camera, and make sure your flash is working while doing so:
- Switch your camera from AF to MF (there's a button on your camera lens that can be switched from AF (Auto Focus) to MF (Manual Focus) and back).
- Press the shutter button halfway and the camera will focus on the subject.
- Switch back to Manual Focus.
Test if the camera is focused by taking a photo. Repeat the process if needed. If you're using an LED ring, remove it before focusing your camera.
Possible issues:
- The camera will not be able to focus in low-light conditions — make sure your subject is well lit.
- The LED ring might be obstructing the lens from moving freely.
- The subject is moving.
- Other people are moving in the frame.
- Autofocusing while the subject is very far out of focus.
My Photos Are Not in the Right Color
When Printing Only
- Install your printer's color profile. See the DNP color profiles guide.
- If the color profile is already installed, try to remove it and use the default one.
- Try a new ribbon.
On TV Preview Only
If the photo prints fine but its preview on the TV appears with the wrong colors, check your TV display settings.
On TV Preview and When Printing
Check your camera settings (see the recommended camera settings guides).
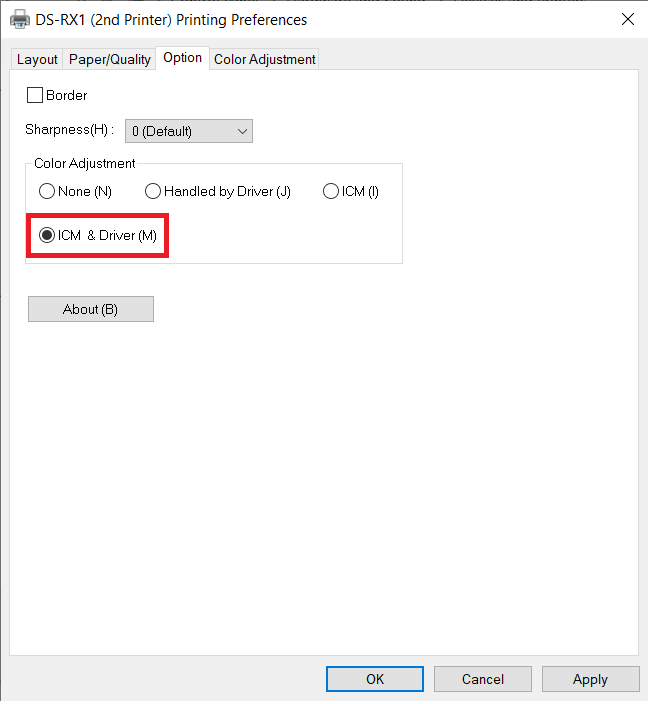
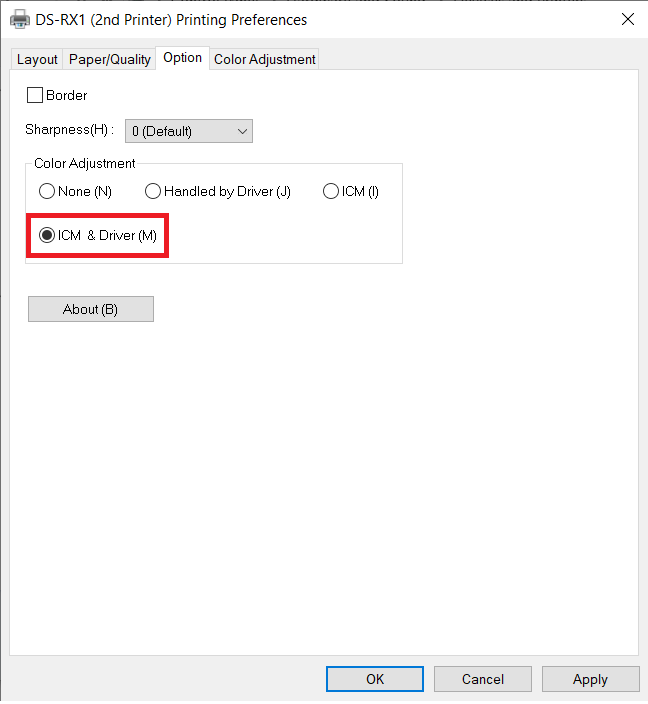
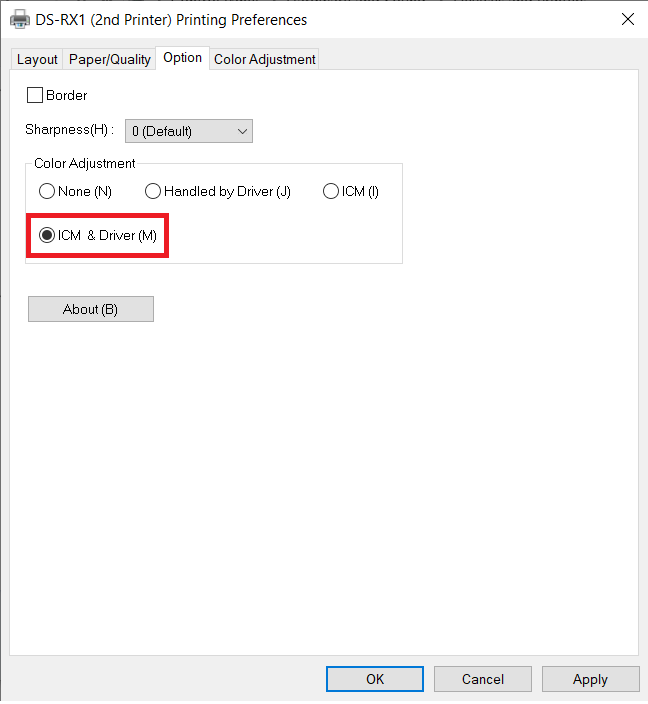
Another solution is to make sure that the Color Adjustment in the Printing preferences isn't on "None". It should be as below:
My Overlay Is Printed With the Wrong Colors, While the DSLR Photos Are Printed With the Right Colors
When exporting an overlay from Photoshop, make sure the selected color profile is CMYK and not RGB.
The RGB color model is made for the display of images in electronic systems only. CMYK refers to the four inks used in color printing: Cyan, Magenta, Yellow, and Key (black), and is ideal for printing purposes.
Open your overlay with Photoshop and save it with the following image color settings:
See Also
- Camera Troubleshooting -- Fix camera connection, exposure, and autofocus issues
Was this helpful?
Related articles
Photos Taken But Not Printing
Quick Checks First Is the printer powered on with the ready light solid? Is paper loaded with the ribbon from the same box? Is the USB cable connected between the printer and booth
Booth Computer Running Slowly at Events
Common Causes Windows Update downloading in the background Antivirus scanning during the event Low disk space on the system drive Too many hours without a restart — memory buildup
How to Export All Event Data
This article explains how to export photos, videos, guest contact data, survey results, and event statistics from Foto Master Cloud.Exporting Photos and Videos Log in to cloud.foto
License Activated but Events List is Empty
You logged in successfully, your Cloud Licenses tab shows your license as Activated, but when you open FMX (or your booth software) the events list is empty -- nothing to select, n
License Activation Issues
Activating your Foto Master software should take just a minute or two. If something isn't working, this page walks through the fixes step by step. Before anything else, confirm whi